一直以来, 我们都在探讨图系统的各种实现和功能, 但是常见的图语言Gremlin, 和包含Gremlin的本体Tinkerpop, 还没有很清晰的认识.
这次就主要解答一个问题: 如果要自己动手实现一个图数据库, 如何引入Tinkerpop支持 ? (以及它的工作机制是什么)
0x00.简介
这篇文章不是入门篇, 如果还不知道Gremlin是什么, 也不知道Tinkerpop是什么, 建议可以看看官方文档, 或者我之前写的函数式图语言Gremlin和.图引擎Tinkerpop (当然那时候写的不好, 见谅…)
直接进入正题, 首先还是搬出引用过的TP整体结构图:
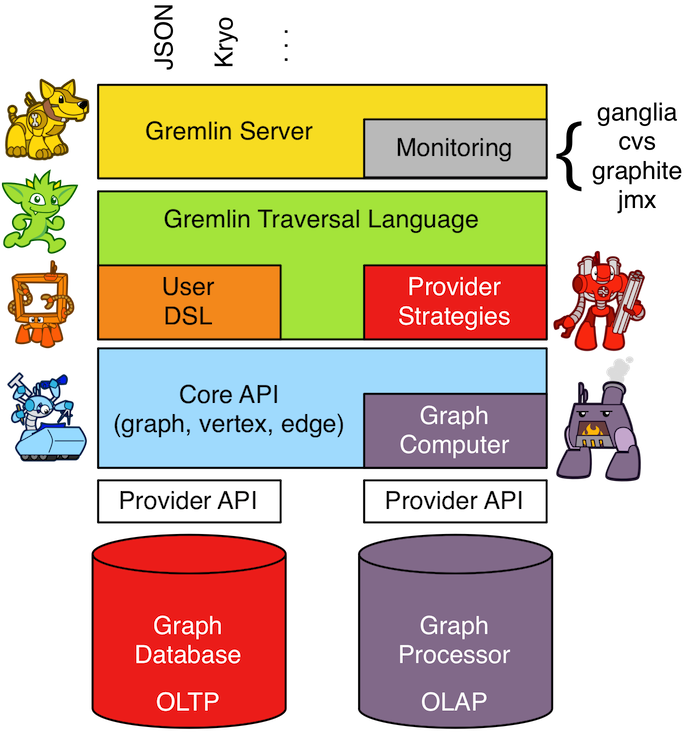
不难看出, 对实现一个基本的图DB来说, 最主要的是实现最后一层(Provider API) , 一旦最后一层最小实现了, 它就自动的实现了上层的大部分功能, (how?) 其中最次要的是顶层的命令行/HTTP访问口. 那接下来依次看看如何接入Tinkerpop, 接入之后又是怎么在解析Gremlin语句的.
0x01. 实现核心图API
实现Gremlin的核心API主要包含实现OLTP + OLAP两个部分:
- OLTP部分:
- 数据结构 : 最少要实现
Graph, Vertex, Edge, 和 Property,Element 这几个接口, 然后进一步如果你实现了VertexProperty ,Index , Transaction 这些接口, 那就可以说实现了完整的Structure API.
- 遍历操作 :
TraversalStrategy (遍历策略)的实现, 目的是优化图的具体遍历, 完整实现后称之为Process API
- OLAP部分:
- 数据结构:
GraphComputer, Messenger 和Memory 是最少要实现的 (并且OLAP需要OLTP基于实现)
1.数据结构
首先一个图, 那后面我就以XGraph 为例子, 简单介绍一下一个图应该有哪些基础OLTP功能:
1
2
3
4
5
6
7
|
Graph g = XGraph.open();
Vertex p1 = g.addVertex(T.label, "person", T.id, 1, "name", "jin");
Vertex p2 = g.addVertex(T.label, "person", T.id, 2, "name", "tom");
p1.addEdge("likes",p2, T.id, 3, "date", "20190220");
|
这里的T 是Tinkerpop的一个枚举 , 这样就构成了一个最经典的图, 然后具体的数据结构实现, 参考TP自带的TinkerGraph 模块, 里面实现了一个最简的图. (我在之前也写了TinkerGraph的源码分析)
接下来补充说下实现过程中的注意事项:
- 首先实现
structure包中的接口(数据结构) ,然后实现process 包中的接口(遍历操作)
- 尽量复用Tinkerpop已经提供的各种工具类
- 比如使用
ElementHelper , GraphComputerHelper, VertexProgramHelper 这种来进行很多通用的图操作. (封装了大量迭代器和λ)
- 比如使用
StringHelper 的toString() 确保输出的一致性. 包括异常输出等..
- 如果要实现OLAP, 则
ComputerGraph 会充当一个Wrapper 的作用, 确保图计算过程中语义解释合理
实现了上面的基础数据结构, 就可以说最快的实现了一个图的OLTP , 此时你就可以使用gremlin和gremlin-server之类的了(这部分是完全不需要你来写代码的), 可以说是非常的简易吧.
但是实际的应用中, 一般数据不会只存在内存中, 最后都需要落地, 如果要用特定的图序列化器, 那么还需要实现一下Graph接口的 的io方法. ( 注意, 这是非必须的.)
2. IO接口 (非必须)
实现自定义序列化方式的第一步就是要实现IoRegistry 接口, 相当于注册并使它生效, 但是有些特定的格式是不允许自定义序列化器的, 也就是说如果XGraph 要支持某些特定数据格式, 就必须符合Tinkerpop 定义, 当然这种情况很少. 来看看常用的几种序列化方案:
- Gryo : 有几种可选的方式实现:
- 通过实现
Kryo 序列化器, 至于序列化的粒度可以选择
- 实现
Function<Kryo, Serializer (没查这是什么..)
- GraphSon : 实现
Jackson 的 SimpleModule模块就行了,
这里以HugeGraphIoRegistry 为例, 简单看看怎么注册: (具体实现就不单独搬了, 可参看TinkerGraph的实现)
1
2
3
4
5
6
7
8
9
10
11
12
13
14
15
16
17
18
19
20
21
| public class HugeGraphIoRegistry extends AbstractIoRegistry {
private static final HugeGraphIoRegistry instance =
new HugeGraphIoRegistry();
public static HugeGraphIoRegistry instance() {
return instance;
}
private HugeGraphIoRegistry() {
HugeGryoModule.register(this);
HugeGraphSONModule.register(this);
}
@SuppressWarnings("rawtypes")
@Override
public void register(Class<? extends Io> ioClass, Class clazz, Object ser) {
super.register(ioClass, clazz, ser);
}
}
|
0x02.实现OLAP
因为在Tinkerpop中, OLAP的实现必须基于OLTP实现, 而且它的实现其实较为复杂, 所以这部分是可选的, 现有大部分引入了Tinkerpop支持的图系统对这一块的支持也不够好, 那么不妨来看看如果要使用TP的OLAP具体需要实现的数据结构的作用:
GraphComputer: 执行管理图计算任务的核心, 不管是VertexProgram 还是MR任务都是从这提交, 并且也提供了任务资源的隔离Memory: 全局的内存数据结构 (用于一些特定K-V对, ANDing, ORing, INCRing, 和SETing ) Messenger: 消息分发和汇总的结构, 调度VertexProgram到多个顶点.MapReduce.MapEmitter: 汇总由MR任务在Map阶段给出的K-V对.MapReduce.ReduceEmitter: 汇总由MR任务在Reduce阶段给出的K-V对.
其中, VertexProgram 和 MapReduce 的接口定义在process/computer 包内, 类似MR作业一样, 这些接口的实现由具体的业务去写. 图不关心它的实现, 然后为了方便大家上手, TP提供了两个OLAP的整合实现 , 一个是TinkerGraph .另一个是SparkGraphCounter (Hadoop)模块, 官方建议是大量参考实现方式… 接下来详细说一下上面的5个核心结构作要实现什么:
1.GraphComputer
从TinkerGraph实现中可以看出, submit() 方法, 是整个图计算类最复杂/核心的方法, 实现它就差不多实现了GraphComputer的核心 , 它需要做:
执行OLAP任务之前的检查操作, 包括不限于任务是否被提交, 是否至少存在1个 VertexProgram 或 1个MR任务 .
- 如果是VertexProgram, 还需要检查它是否满足要执行的图计算特性 (比如是否支持PageRank ,ShortestPath..)
为图计算初始全局的Memory 结构, 然后执行以下的循环
- 首先执行
VertexProgram.setup() 一次.
- 然后在每个分发的顶点上执行
VertexProgram.execute()
- 最后执行
VertexProgram.terminate() , 获得一个bool返回值
- 如果为
true, 开一个新线程开始执行MR任务, 原始线程跳回2.2, 继续执行execute() ,依次迭代
- 如果为
false ,停止执/行
对每个分发的顶点, 执行MR任务流程 : map() ---> (若有) combine() --> reduce()
上述操作中不断更新Memory 的数据值.
创建一个暂存上面图计算后的子图和Memory 结构的对象, 命名为ComputerResult
2.Memory
从上面可以知道, Memory是在执行VertexProgram.setup()的时候初始化的, 在第一轮任务分发中, 它对所有执行任务的顶点都是可见的, 然后每次顶点执行任务后可以在它的线程中更新Memory的值, 但是这次更新只有在第一轮所有顶点全部执行完任务后, 下一轮其他顶点才能看到, 同理其他顶点也是如此. 然后不断重复这个过程, 直到VertexProgram完结.
3.Messenger
消息分发对象和Memory对象是比较类似的, 所有执行任务的顶点也都能在它上面进行读/写数据的操作, 那么和内存对象主要的区别在于 :
- 读 :
Messenger 读取的数据不是实时的, 而是在上一轮中发送给顶点的消息
- 写 : 而它写入的数据也不是实时的, 而是在下一轮中由接收消息的顶点读取的消息
4.MapReduce (Emitters)
类似原始的Hadoop-MR模型, Tinkerpop中也设计了类似的MR接口, 但是还是有些区分, 主要的区别在于: 所有Mappers的工作都在加工图的顶点,而不能处理普通K-V对 , 而且. 访问顶点的时候无法访问其拥有的边 —- 只能访问顶点的属性., 这样设计的目的是为了大幅减少MR任务中数据量的规模, 以及在多个JVM中分发的实现复杂性. 而边的信息在VertexProgram.execute() 方法中就能计算得到
同时需要注意的是, 在MR过程中, 顶点会被暂时设置为只读, 只能读取它的属性和一些标记信息, 最后由之前说的业务来实现具体的MR操作. 这里用Tinkergraph 为例, 截取一下如何具体使用MR任务:
1
2
3
4
5
6
7
8
9
10
11
12
13
14
15
16
17
18
19
20
21
22
23
24
25
26
27
28
29
30
31
32
33
34
35
36
37
38
39
40
41
42
43
44
45
46
47
48
49
50
51
52
53
54
55
56
57
58
59
60
61
62
63
64
65
66
67
68
69
70
71
|
public class TinkerMapEmitter<K, V> implements MapReduce.MapEmitter<K, V> {
public Map<K, Queue<V>> reduceMap;
public Queue<KeyValue<K, V>> mapQueue;
private final boolean doReduce;
public TinkerMapEmitter(final boolean doReduce) {
this.doReduce = doReduce;
if (this.doReduce)
this.reduceMap = new ConcurrentHashMap<>();
else
this.mapQueue = new ConcurrentLinkedQueue<>();
}
@Override
public void emit(K key, V value) {
if (this.doReduce)
this.reduceMap.computeIfAbsent(key, k -> new ConcurrentLinkedQueue<>()).add(value);
else
this.mapQueue.add(new KeyValue<>(key, value));
}
protected void complete(final MapReduce<K, V, ?, ?, ?> mapReduce) {
if (!this.doReduce && mapReduce.getMapKeySort().isPresent()) {
final Comparator<K> comparator = mapReduce.getMapKeySort().get();
final List<KeyValue<K, V>> list = new ArrayList<>(this.mapQueue);
Collections.sort(list, Comparator.comparing(KeyValue::getKey, comparator));
this.mapQueue.clear();
this.mapQueue.addAll(list);
} else if (mapReduce.getMapKeySort().isPresent()) {
final Comparator<K> comparator = mapReduce.getMapKeySort().get();
final List<Map.Entry<K, Queue<V>>> list = new ArrayList<>();
list.addAll(this.reduceMap.entrySet());
Collections.sort(list, Comparator.comparing(Map.Entry::getKey, comparator));
this.reduceMap = new LinkedHashMap<>();
list.forEach(entry -> this.reduceMap.put(entry.getKey(), entry.getValue()));
}
}
}
public class TinkerReduceEmitter<OK, OV> implements MapReduce.ReduceEmitter<OK, OV> {
protected Queue<KeyValue<OK, OV>> reduceQueue = new ConcurrentLinkedQueue<>();
@Override
public void emit(final OK key, final OV value) {
this.reduceQueue.add(new KeyValue<>(key, value));
}
protected void complete(final MapReduce<?, ?, OK, OV, ?> mapReduce) {
if (mapReduce.getReduceKeySort().isPresent()) {
final Comparator<OK> comparator = mapReduce.getReduceKeySort().get();
final List<KeyValue<OK, OV>> list = new ArrayList<>(this.reduceQueue);
Collections.sort(list, Comparator.comparing(KeyValue::getKey, comparator));
this.reduceQueue.clear();
this.reduceQueue.addAll(list);
}
}
}
public void reduce(final OK key, final Iterator<OV> values, final ReduceEmitter<OK, OV> emitter) { ... }
|
reduce() 执行的时候,传入加工过的emitter 对象, 那结合Map的操作, 整个过程是什么样的呢? 可以看看接下来截取的一个执行MR任务片段的调用.
1
2
3
4
5
6
7
8
9
10
11
12
13
14
15
16
17
18
19
20
21
22
23
24
25
26
27
28
29
30
31
32
33
34
35
36
37
38
39
40
41
|
for (final MapReduce mapReduce : mapReducers) {
if (mapReduce.doStage(MapReduce.Stage.MAP)) {
final TinkerMapEmitter<?, ?> mapEmitter = new TinkerMapEmitter<>(mapReduce.doStage(MapReduce.Stage.REDUCE));
final SynchronizedIterator<Vertex> vertices = new SynchronizedIterator<>(this.graph.vertices());
workers.setMapReduce(mapReduce);
workers.mapReduceWorkerStart(MapReduce.Stage.MAP);
workers.executeMapReduce(workerMapReduce -> {
while (true) {
final Vertex vertex = vertices.next();
if (null == vertex) return;
workerMapReduce.map(ComputerGraph.mapReduce(vertex), mapEmitter);
}
});
workers.mapReduceWorkerEnd(MapReduce.Stage.MAP);
mapEmitter.complete(mapReduce);
if (mapReduce.doStage(MapReduce.Stage.REDUCE)) {
final TinkerReduceEmitter<?, ?> reduceEmitter = new TinkerReduceEmitter<>();
final SynchronizedIterator<Map.Entry<?, Queue<?>>> keyValues = new SynchronizedIterator((Iterator) mapEmitter.reduceMap.entrySet().iterator());
workers.mapReduceWorkerStart(MapReduce.Stage.REDUCE);
workers.executeMapReduce(workerMapReduce -> {
while (true) {
final Map.Entry<?, Queue<?>> entry = keyValues.next();
if (null == entry) return;
workerMapReduce.reduce(entry.getKey(), entry.getValue().iterator(), reduceEmitter);
}
});
workers.mapReduceWorkerEnd(MapReduce.Stage.REDUCE);
reduceEmitter.complete(mapReduce);
mapReduce.addResultToMemory(this.memory, reduceEmitter.reduceQueue.iterator());
} else {
mapReduce.addResultToMemory(this.memory, mapEmitter.mapQueue.iterator());
}
}
}
|
0x03. 整合Gremlin支持
如果完成了OLTP的最基本支持**, 理论上**你不用做其他事就能直接整合Gremlin语法的支持了, 当然实际使用中, 比如XGraph 希望引入gremlin语法支持, 一般比较好的做法还是借助一个中间层, 引入GremlinPlugin ,然后注册实现.
这个操作其实很简单, 以Tinkergraph为例 , 其实就是把在OLTP和OLAP自己实现的类都集中绑定一下 ,同理如果是neo4j 或者Hugegraph要用, 最推荐的做法也是这样注册. (当然你不这样注册好像也是可以使用gremlin的, 尚不确定…)
1
2
3
4
5
6
7
8
9
10
11
12
13
14
15
16
17
18
19
20
21
22
23
24
25
26
27
28
29
30
31
32
33
34
| public final class TinkerGraphGremlinPlugin extends AbstractGremlinPlugin {
private static final String NAME = "tinkerpop.tinkergraph";
private static final ImportCustomizer imports = DefaultImportCustomizer.build()
.addClassImports(TinkerEdge.class,
TinkerElement.class,
TinkerFactory.class,
TinkerGraph.class,
TinkerGraphVariables.class,
TinkerHelper.class,
TinkerIoRegistryV1d0.class,
TinkerIoRegistryV2d0.class,
TinkerIoRegistryV3d0.class,
TinkerProperty.class,
TinkerVertex.class,
TinkerVertexProperty.class,
TinkerGraphComputer.class,
TinkerGraphComputerView.class,
TinkerMapEmitter.class,
TinkerMemory.class,
TinkerMessenger.class,
TinkerReduceEmitter.class,
TinkerWorkerPool.class).create();
private static final TinkerGraphGremlinPlugin instance = new TinkerGraphGremlinPlugin();
public TinkerGraphGremlinPlugin() {
super(NAME, imports);
}
public static TinkerGraphGremlinPlugin instance() {
return instance;
}
}
|
0x04.更高级的实现
上面说的是常见的图系统可以选择实现的几个重要模块, TP还提供了一些其他模块, 可以选择性的实现 :
- Traversal Strategies(遍历策略) :
TraversalStrategy用于在执行gremlin之前改变遍历, 比如 g.V().has("name","jin")的语句本来要遍历所有顶点的name属性, 在有属性索引的时候, 我就能让它调用索引进行二分查找, 这样时间复杂度就由O(n) 转变为O(logn) 了, 类似的比如模糊索引, 范围索引都需要指定一些策略, 否则默认都会是全查.. 例如TinkerGraphStepStrategy的实现就针对has() 做了判断 :
1
2
3
4
5
6
7
8
9
10
11
12
13
14
15
16
17
18
19
20
21
22
| @Override
public void apply(final Traversal.Admin<?, ?> traversal) {
if (TraversalHelper.onGraphComputer(traversal))
return;
for (final GraphStep originalGraphStep : TraversalHelper.getStepsOfClass(GraphStep.class, traversal)) {
final TinkerGraphStep<?, ?> tinkerGraphStep = new TinkerGraphStep<>(originalGraphStep);
TraversalHelper.replaceStep(originalGraphStep, tinkerGraphStep, traversal);
Step<?, ?> currentStep = tinkerGraphStep.getNextStep();
while (currentStep instanceof HasStep || currentStep instanceof NoOpBarrierStep) {
if (currentStep instanceof HasStep) {
for (final HasContainer hasContainer : ((HasContainerHolder) currentStep).getHasContainers()) {
if (!GraphStep.processHasContainerIds(tinkerGraphStep, hasContainer))
tinkerGraphStep.addHasContainer(hasContainer);
}
TraversalHelper.copyLabels(currentStep, currentStep.getPreviousStep(), false);
traversal.removeStep(currentStep);
}
currentStep = currentStep.getNextStep();
}
}
}
|
Step (步骤) : 类似gremlin中的has() , filter() ,这些都是一个单独的Step ,每条gremlin语句中的step最终都会在TraversalStrategy 中调用, 那么如果我想新增一个单独的Step, 比如pagerank() , 那就可以自己实现, 然后注册进Tinkerpop中 ,但是这样最大的缺点就是侵入性很强, 所以Hugegraph 采用了另一种策略, 绕开gremlin实现扩展的API.
例子待补充…
0x05.小结
首先, 强烈推荐通读一下TinkerGraph 的源码, 我也是通读了一遍之后加上官方文档的补充解释, 才能比较好的理解整个流程. 之前写过一个``TinkerGraph` 的源码阅读系列, 不过因为时间原因中间写的比较粗略, 大家可以凑合看, 有问题欢迎及时反馈.
然后从整篇文章可以看出, 如果你已经实现好了一个图系统, 比如叫XGraph ,那么你在有类似的图基础之后, 最快可以在一周内就能把Tinkerpop基本引入进来(包括读代码+开发+测试+部署), 至于高级特性的实现, 不一定需要, 也不需急于一时.
最后, 这里没有细节的讲Tinkerpop的各种Step . 各种Path 的细节, 只是比较提纲的结合了部分代码讲一下核心实现, 没提Gremlin 如何转换为图的API调用的, 也没有提及gremlin-console/server 的实现, 前者以后会单独再说, 后者觉得暂时不是很需要关心.. 就先这样
后续待补充
参考资料:
- TinkerGraph源码学习(三)
- Tinkepop-provider-docs
- Hugegraph相关代码段
- 图计算引擎Tinkerpop