在gogs和harbor搭建好之后,就开始进入CI/CD核心Jenkins之路 . 熊のpipeline实践参考 . 官方pipeline语法
0x00.初识Jenkins Jenkins是Java开发的开源软件,对Java-maven项目支持很好,所以很适合以Java开发为主线的应用场景.因为其微服务和主-从结构特性,现在多在docker上部署. 它有几个核心概念: 参考devops为什么选jenkins短视频
Jenkins pipeline是一套插件(docker,k8s都有对应插件).
Jenkinsfile是一个包含pipeline的文本(你可以类比dockerfile).Blue ocean是pipeline的可视化前端插件(可以参见下图)
根据官方定义 . 把Jenkins做的事统称为三. 构建 - 测试 -部署 . 也就是我们常说的自动化运维核心.核心是pipeline的工作流. 如下:
然后一般我们生产可用最小环境一般是三个jenkins. 一主二从. (分部对应生产 环境,测试 环境).
0x01.Jenkins on Docker 本身运行Jenkins依赖Java运行环境,但是Docker中这些都不需要我们考虑了.最原生的做法是docker pull jenkins 一步到位. 不过这里后面要说明一下在k8中需要修改一些东西.并且之后的jenkins镜像也应该是在本地的harbor中,这里先用原生做次示范. 参考官方文档
官方仓库中有几种jenkins的镜像. 当前推荐的是使用 jenkinsci/blueocean
This image contains the current Long-Term Support (LTS) release of Jenkins (which is production-ready ) bundled with all Blue Ocean plugins and features. This means that you do not need to install the Blue Ocean plugins separately.
所以首先使用docker pull jenkinsci/blueocean 拉取,因为网络环境跟400MB大小原因.强烈建议第一次拉取之后本地化(docker save jenkinsci/blueocean > jenkinsBO.tar )初始化我使用参数如下 : (详细完整版见官网,在第一次运行之后可以加入 -d \ 后台运行 ) docker建议运行版本17.0x (cent下更新方法见官网 )
1
2
3
4
5
6
7
docker run \ -u root \ -p 8080:8080 \ -p 50000:50000 \ -v jenkins-data:/var/jenkins_home \ -v /var/run/docker.sock:/var/run/docker.sock \ jenkinsci/blueocean
输入后回车,日志会不断初始化,直至出现以下提示. 然后等待最后的Finished Download metadata...Jenkins is fully up and running ,就可以访问ip:8080端口初始化了.
1 2 3 4 5 6 Please use the following password to proceed to installation: 4d886977951a4b7dbc6986e3f018b438
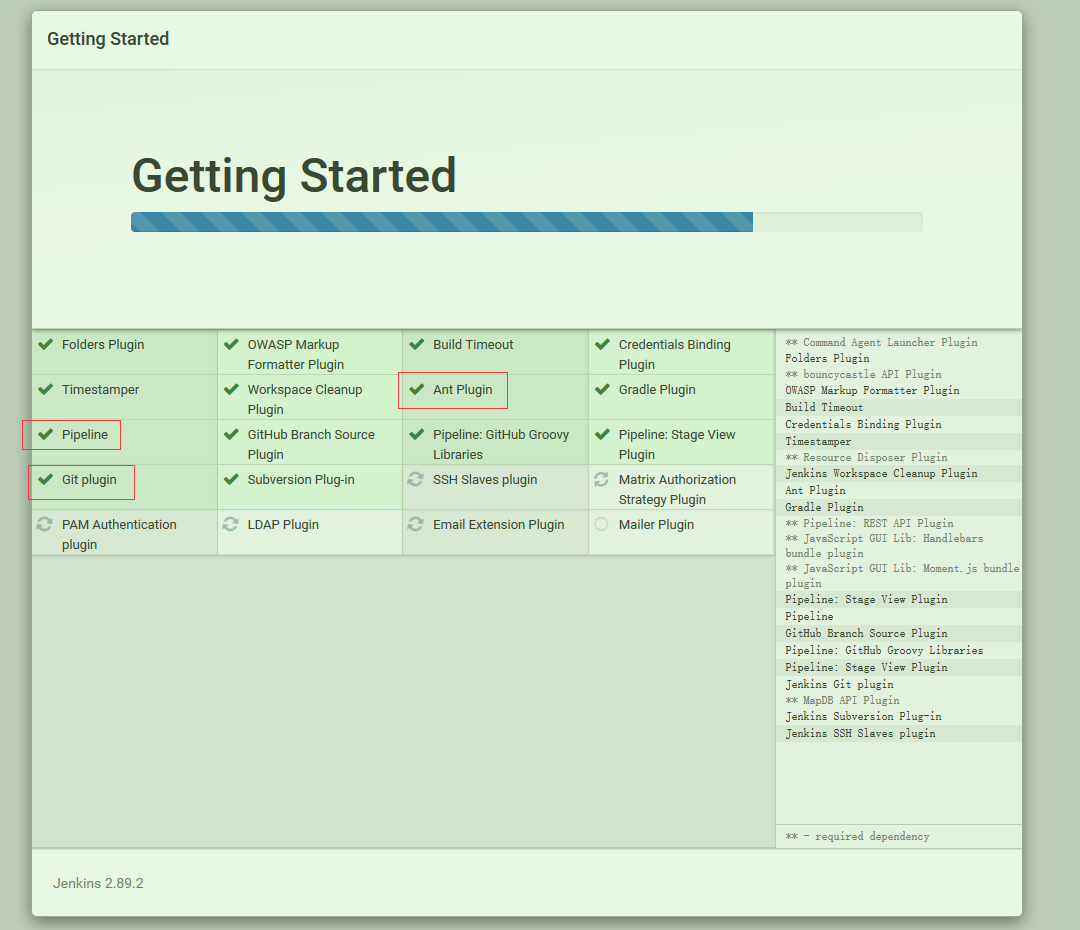
输入密码后,选择推荐选项 . 就可以看到很舒适的安装流程.
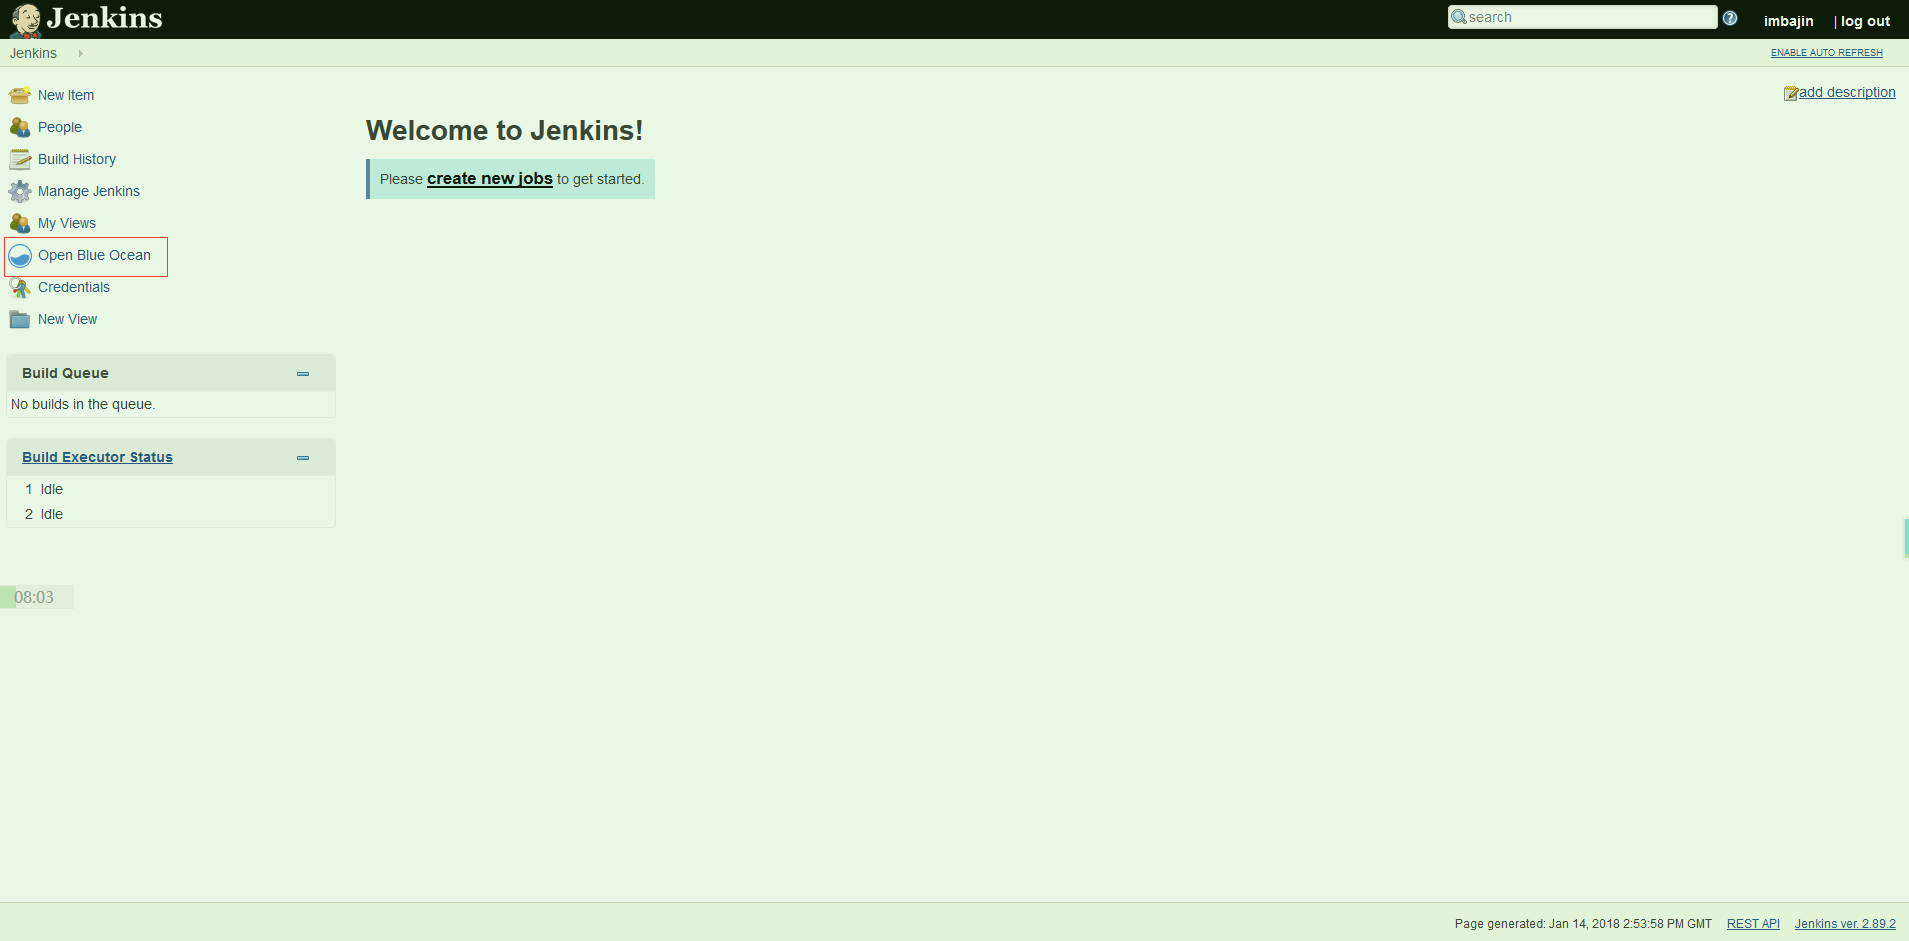
然后注册第一个管理员账户.非常简单的可以看到界面,并且内置了blue ocean.(关于blue ocean的事之后单独说)
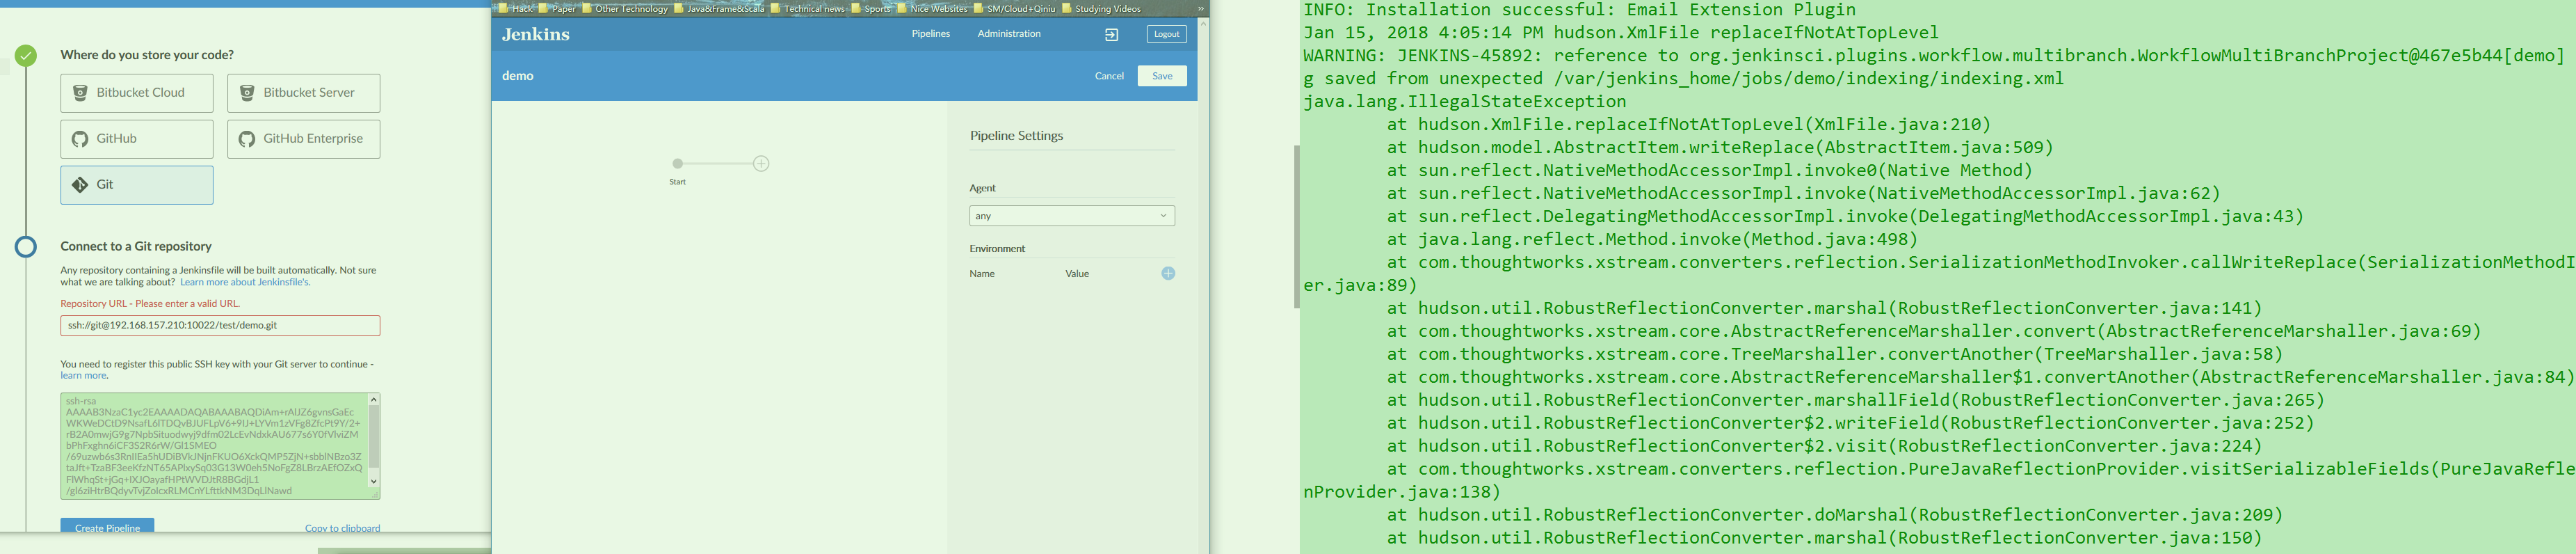
这里我们可以直接点blue ocean 发现界面会好看很多,然后提示创建一个pipeline .选择git仓库. 然后下面只能使用SSH的方式连接. 默认jenkins生成了一对公私钥. 然后这里核心来了. 我们得先确保之前的gogs的ssh方式连接是无误的 .
这中间有不少曲折,关于SSH失败的问题单独在调错文章详细说,反正目前测试如果同在一个节点,jenkins的blue ocean无法访问到gogs的仓库. 所以SSH永远都是失败的…具体原因可能跟docker容器网络有关. 暂时解决方案是把gogs与jenkins放在不同节点
这里列一下失败 - 成功 -日志 报错的图.日志报错可能是因为默认的git仓库没有jenkinsfile 文件,会提示你用editor 创建. 关于jenkinsfile的官方文档 . 因为这貌似做了升级,这里先看pipeline editor的官方文档.
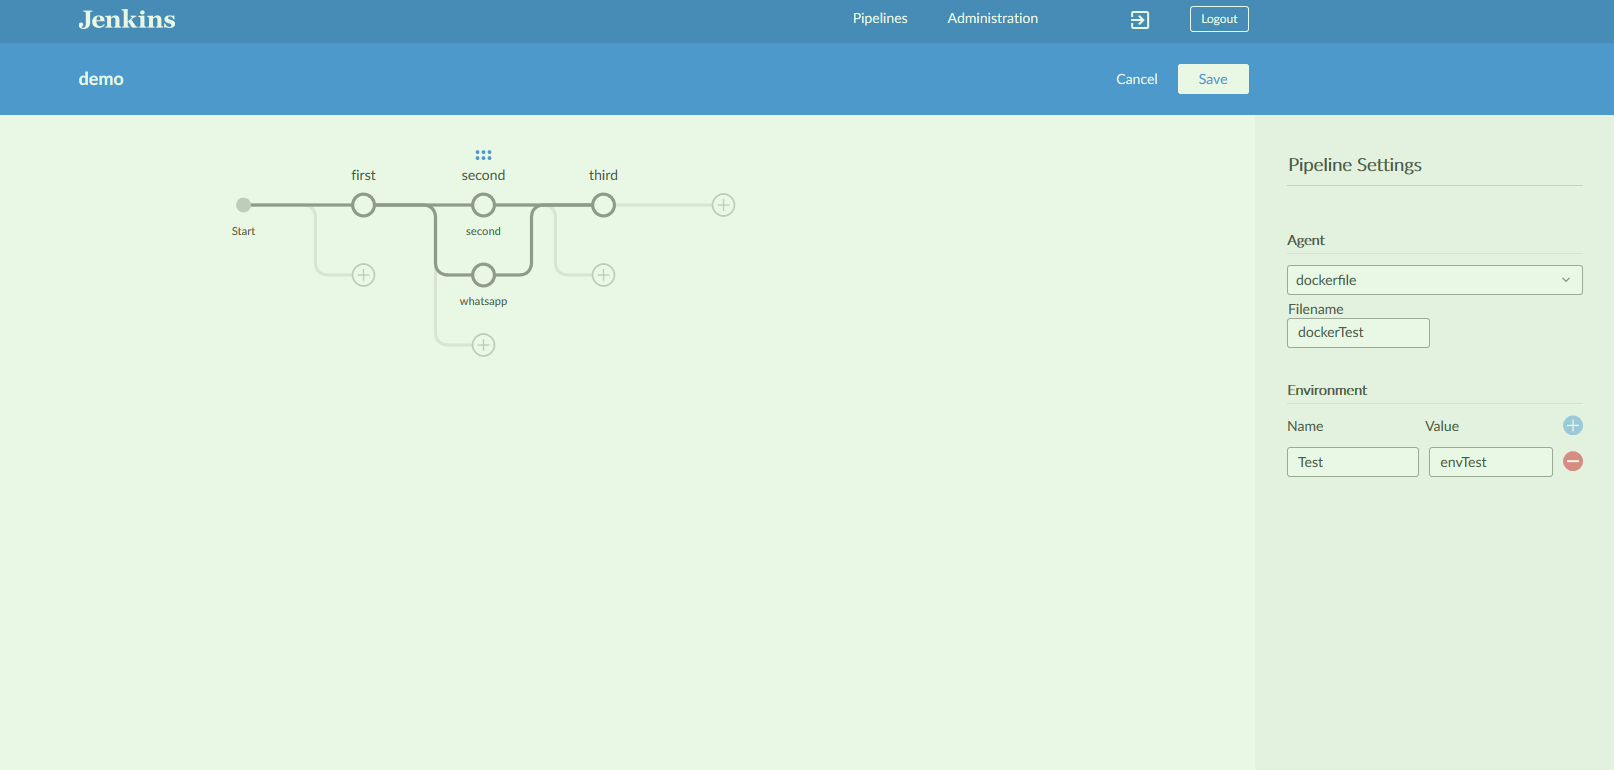
根据editor界面. 我们可以很快上手,并且非常直观的看出步骤间的递进&并列 关系.
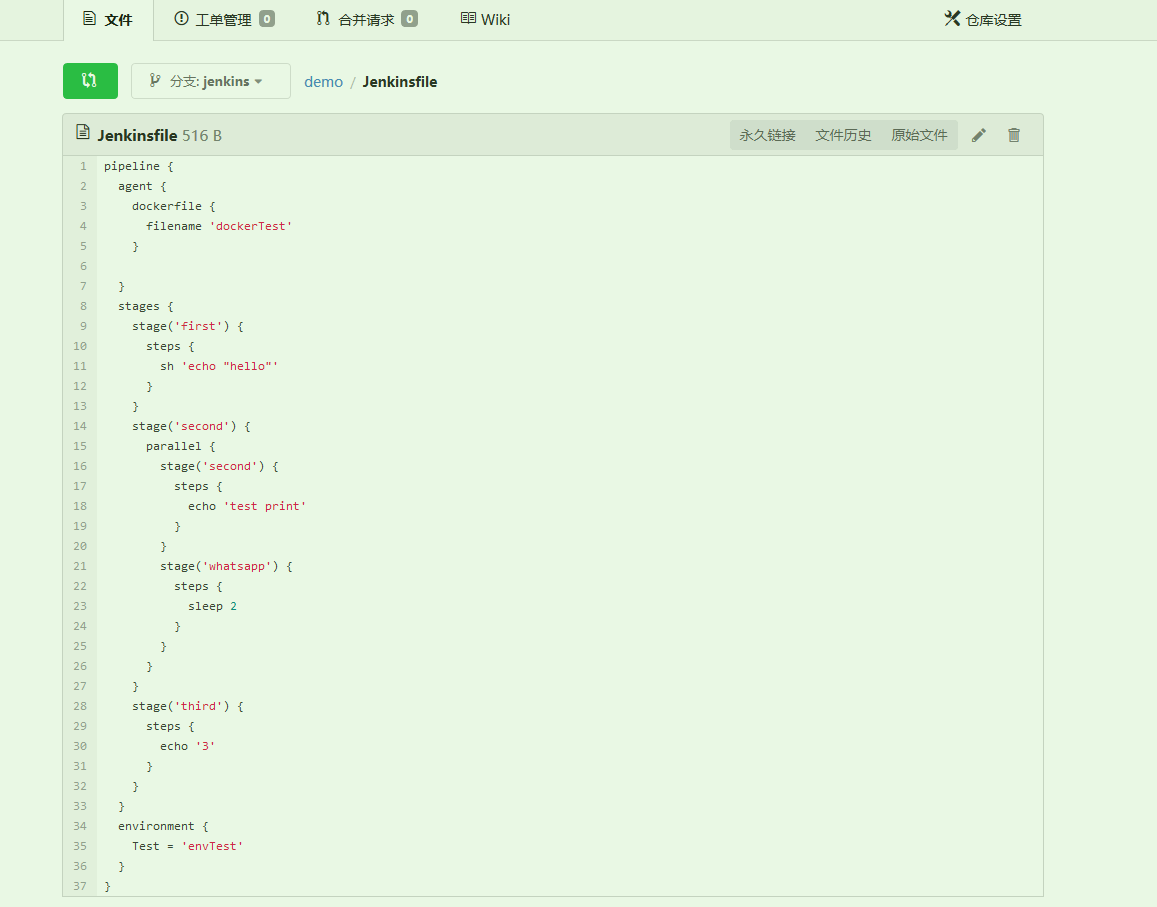
然后生成到jenkins分支 (默认是master)并运行之后,可以看到自动生成了jenkinsfile .表示demo运行成功.
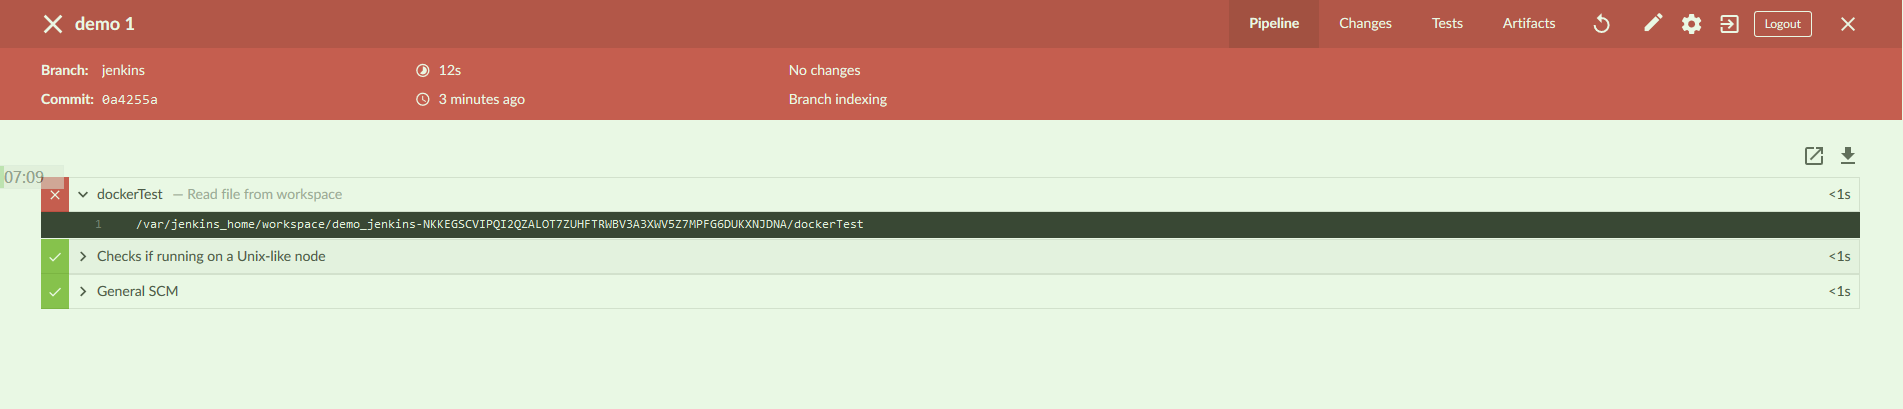
然后可以对比一下官方jenkins文档的实例,可以更快理解. 也可以推断pipeline editor 就是图形化的pipeline.方便普通用户快速上手. 然后我们k8需要的dockerfile,在这可以定义并添加进来. 下图是因为没有dockerfile所以第一步报错了. 但是后面并不会受影响. 整个流程也很清晰. (下面是一个官方jenkinsfile参考示例 ,可以直接运行测试)
1 2 3 4 5 6 7 8 9 10 11 12 13 14 15 16 17 18 19 20 21 22 23 pipeline { agent any stages { stage('Build' ) { steps { echo 'Building..' } } stage('Test' ) { steps { echo 'Testing..' } } stage('Deploy' ) { steps { echo 'Deploying....' } } } }
然后后续需要调整或者新增步骤都可以直接用上面的editor修改,详细的完整CD流程的pipeline设置参考 官方:blueOcean创建pipeline .
0x02. java-maven-app 上面做完了基本的pipeline测试. 简单了解了大概,接着gogs的webhook后面开始真正动手实践了. 上手选择一个简单的java-maven-app . 里面带有Junit 的测试,方便我们测试一下完整的最小CI/CD流程.
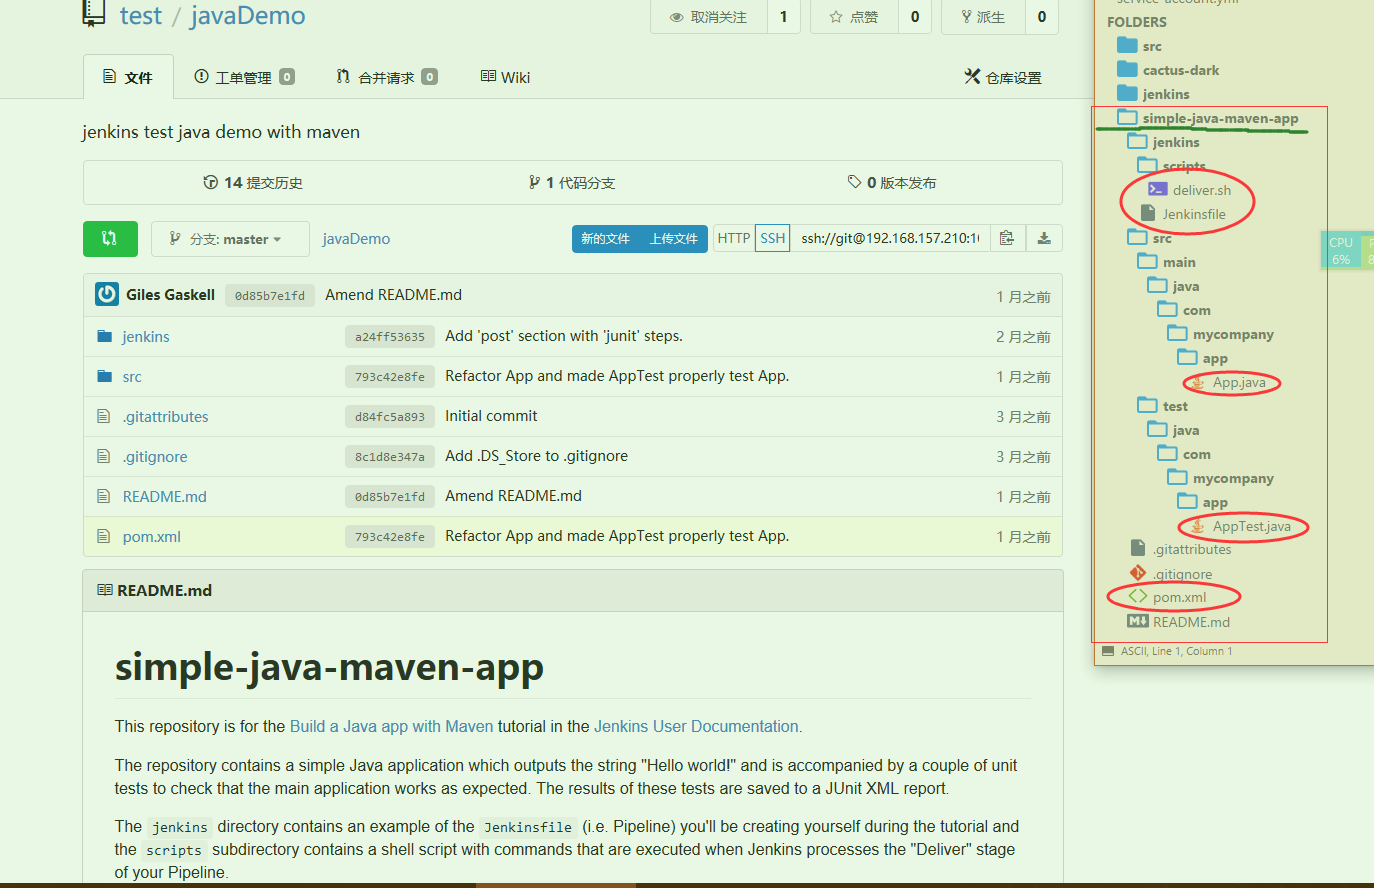
首先把项目丢到gogs新建的一个项目中,这里命名为javaDemo . 目录结构也很简单. 如下所示,核心就一个java文件,一个测试java文件. 然后一个jenkinsfile , 一个pom.xml , 一个deliver.sh .依次看看内容
1 2 3 4 5 6 7 8 9 10 11 12 13 14 15 16 17 18 19 20 21 22 23 24 25 26 27 28 29 30 31 32 33 34 35 36 37 38 39 40 41 42 43 44 45 46 47 48 49 50 51 52 53 54 55 56 57 58 59 60 61 62 63 64 65 66 67 68 69 70 71 package com.mycompany.app;public class App { private final String message = "Hello World!" ; public App () {} public static void main (String[] args) { System.out.println(new App ().getMessage()); } private final String getMessage () { return message; } } package com.mycompany.app;import java.io.ByteArrayOutputStream;import java.io.PrintStream;import org.junit.Before;import org.junit.Test;import org.junit.After;import static org.junit.Assert.*;public class AppTest { private final ByteArrayOutputStream outContent = new ByteArrayOutputStream (); @Before public void setUpStreams () { System.setOut(new PrintStream (outContent)); } @Test public void testAppConstructor () { try { new App (); } catch (Exception e) { fail("Construction failed." ); } } @Test public void testAppMain () { App.main(null ); try { assertEquals("Hello World!" + System.getProperty("line.separator" ), outContent.toString()); } catch (AssertionError e) { fail("\"message\" is not \"Hello World!\"" ); } } @After public void cleanUpStreams () { System.setOut(null ); } }
对应的maven依赖文件 pom.xml
1 2 3 4 5 6 7 8 9 10 11 12 13 14 15 16 17 18 19 20 21 22 23 24 25 26 27 28 29 30 31 32 33 34 35 36 37 <project xmlns ="http://maven.apache.org/POM/4.0.0" xmlns:xsi ="http://www.w3.org/2001/XMLSchema-instance" xsi:schemaLocation ="http://maven.apache.org/POM/4.0.0 http://maven.apache.org/maven-v4_0_0.xsd" > <modelVersion > 4.0.0</modelVersion > <groupId > com.mycompany.app</groupId > <artifactId > my-app</artifactId > <packaging > jar</packaging > <version > 1.0-SNAPSHOT</version > <name > my-app</name > <url > http://maven.apache.org</url > <dependencies > <dependency > <groupId > junit</groupId > <artifactId > junit</artifactId > <version > 4.11</version > <scope > test</scope > </dependency > </dependencies > <build > <plugins > <plugin > <groupId > org.apache.maven.plugins</groupId > <artifactId > maven-jar-plugin</artifactId > <version > 3.0.2</version > <configuration > <archive > <manifest > <addClasspath > true</addClasspath > <classpathPrefix > lib/</classpathPrefix > <mainClass > com.mycompany.app.App</mainClass > </manifest > </archive > </configuration > </plugin > </plugins > </build > </project >
让maven去自动化构建的shell
1
2
3
4
5
6
7
8
9
10
11
12
13
14
15
16
17
18
19
20
21
22
23
24
25
26
27
#!/usr/bin/env bash echo 'The following Maven command installs your Maven-built Java application' echo 'into the local Maven repository, which will ultimately be stored in' echo 'Jenkins' 's local Maven repository (and the "maven-repository" Docker data' echo 'volume).' set -xmvn jar:jar install:install help :evaluate -Dexpression=project.name set +xecho 'The following complex command extracts the value of the <name/> element' echo 'within <project/> of your Java/Maven project' 's "pom.xml" file.' set -xNAME=`mvn help :evaluate -Dexpression=project.name | grep "^[^\[]" ` set +xecho 'The following complex command behaves similarly to the previous one but' echo 'extracts the value of the <version/> element within <project/> instead.' set -xVERSION=`mvn help :evaluate -Dexpression=project.version | grep "^[^\[]" ` set +xecho 'The following command runs and outputs the execution of your Java' echo 'application (which Jenkins built using Maven) to the Jenkins UI.' set -xjava -jar target/${NAME} -${VERSION} .jar
最后附上参考的.gitingore . 可以作为以后的java-ignore模板优化.
1
2
3
4
5
6
7
8
9
10
11
12
13
.DS_Store target/ pom.xml.tag pom.xml.releaseBackup pom.xml.versionsBackup pom.xml.next release.properties dependency-reduced-pom.xml buildNumber.properties .mvn/timing.properties !/.mvn/wrapper/maven-wrapper.jar
然后来开始实践jenkins了,这里用blueocean为例(本质pipeline). [详细解释见官方文档 ] 下面是运行所需,注意稍不同于初始化的时候了.
1
2
3
4
5
6
7
8
$ docker run \ -d \ -u root \ -p 8080:8080 \ -v jenkins-data:/var/jenkins_home \ -v /var/run/docker.sock:/var/run/docker.sock \ -v "$HOME " :/home \ xx.xx.29.37/test/blueocean:1.4
1.使用blueocean创建pipeline 创建参考之前,把ssh://git@192.168.157.210:10022/test/javaDemo.git 添加完后.出现熟悉的pipeline编辑界面. 这里千万注意提前下载到harbor的maven镜像选择自带完整默认库的 . 千万不能使用alpine/slim版,详见排错(二). (如果使用传统pipeline创建,那么注意bo的图形编辑只能 用于multibranch-pipeline. )
然后选择agent为docker,镜像填写本地的maven镜像名maven:3.5.2(例如我这:192.168.157.210/test/maven). 参数-v /root/.m2:/root/.m2
意思是这次pipeline会自动用docker创建一个maven的容器. 然后去完成后面的编译任务. 这给我们在之后的主从集群镜像就提供了一些思路 —- 既然java项目每次都是用maven镜像构建, 何不把maven内嵌到之后的slave镜像 中呢? (使用dockerfile)
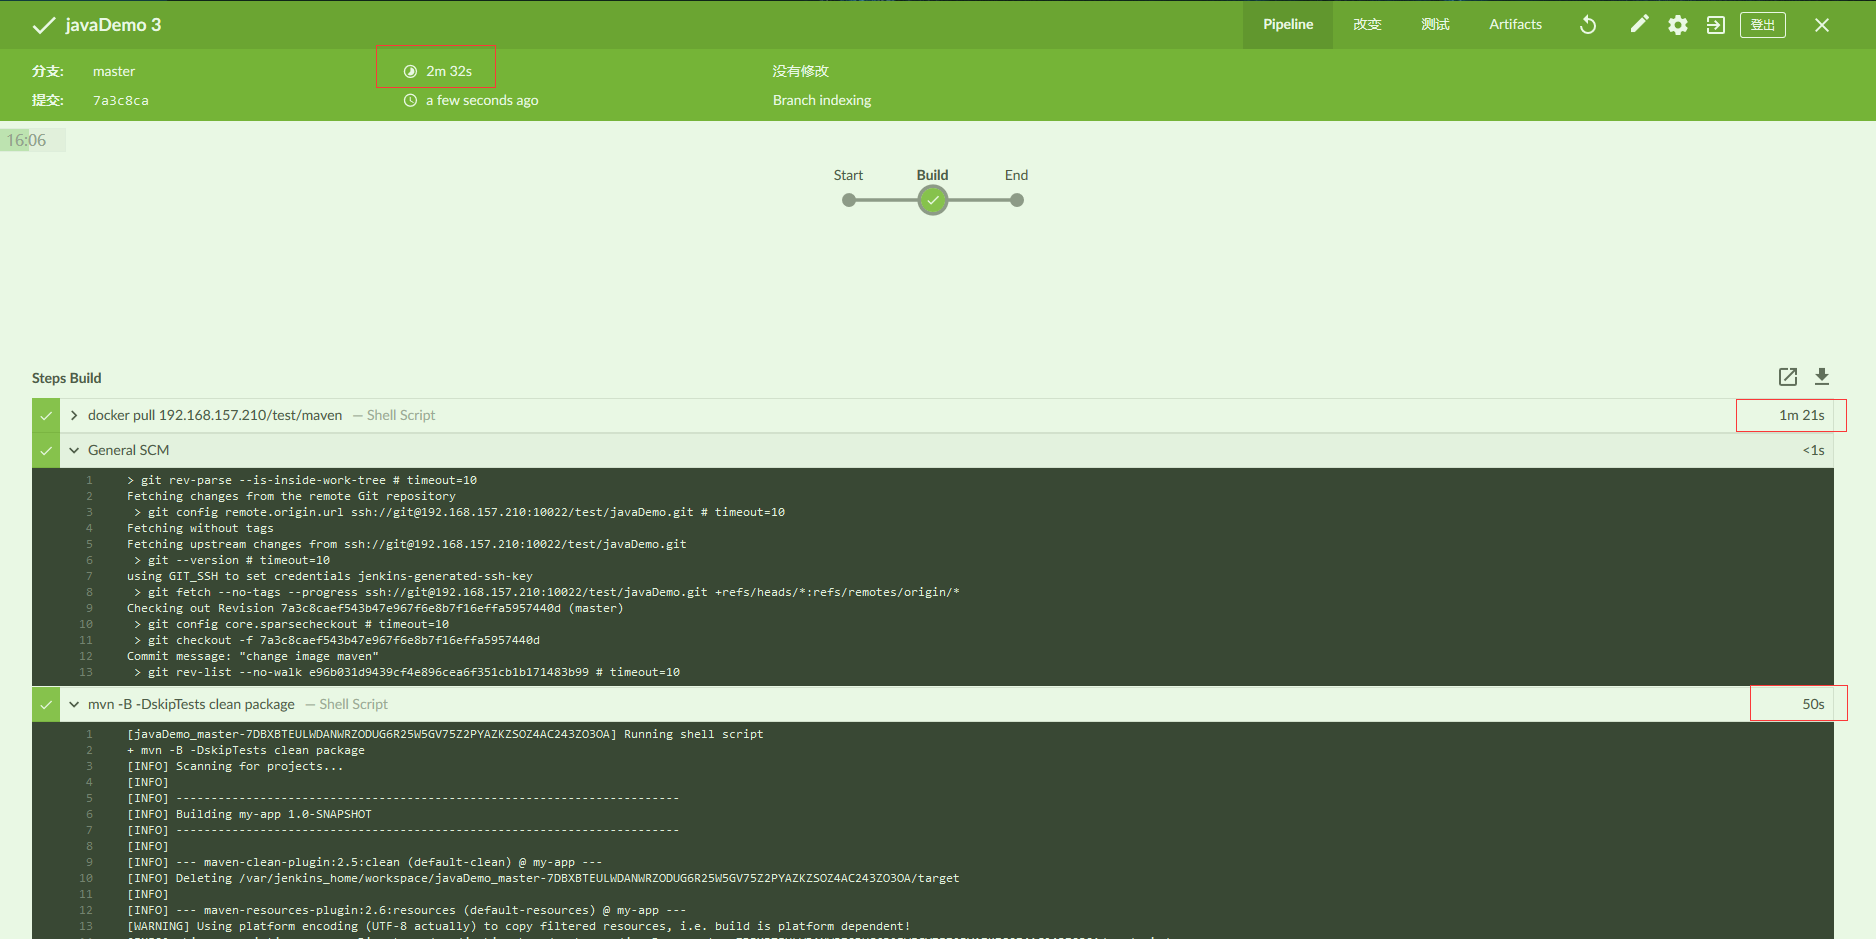
然后添加Bulid stage,添加 Shell Script,这是maven的构建java app命令 (不运行测试)
1 mvn -B -DskipTests clean package
可以看到,总共耗时2分32s,这还是挺长的. 当然主要开销在于构建maven镜像以及maven拉取文件.这些以后都需要留有缓存或者提前内置.就会减少90%的时间了.
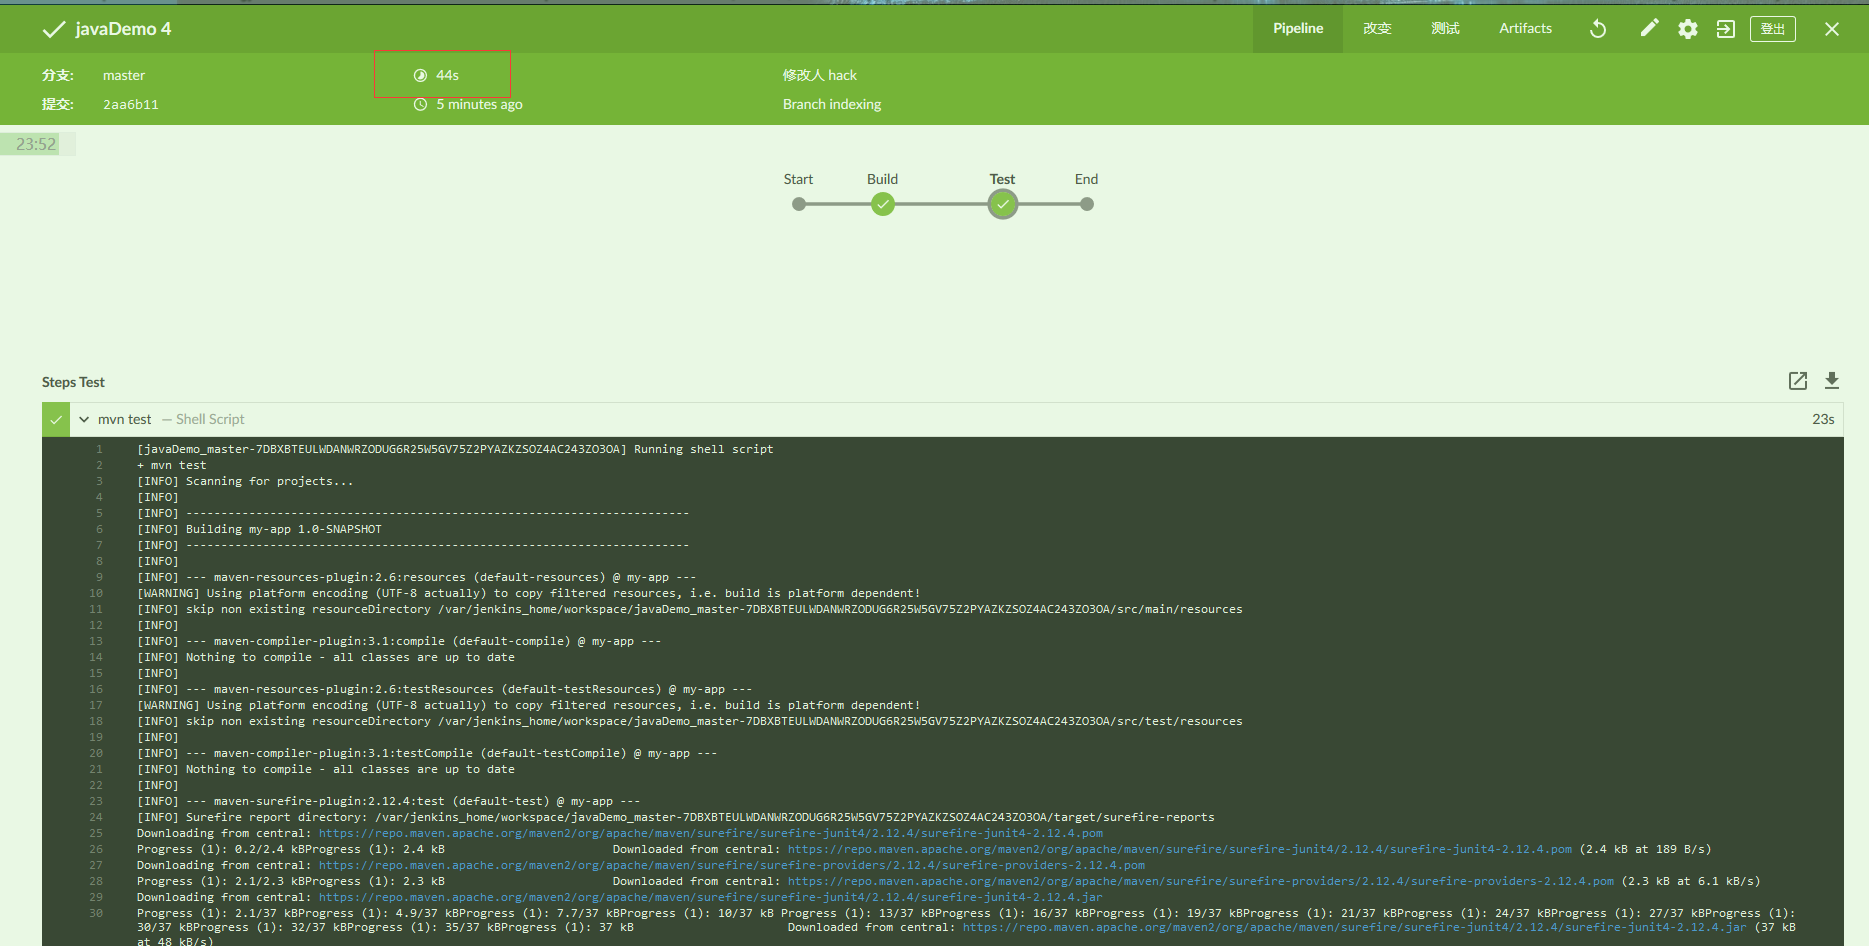
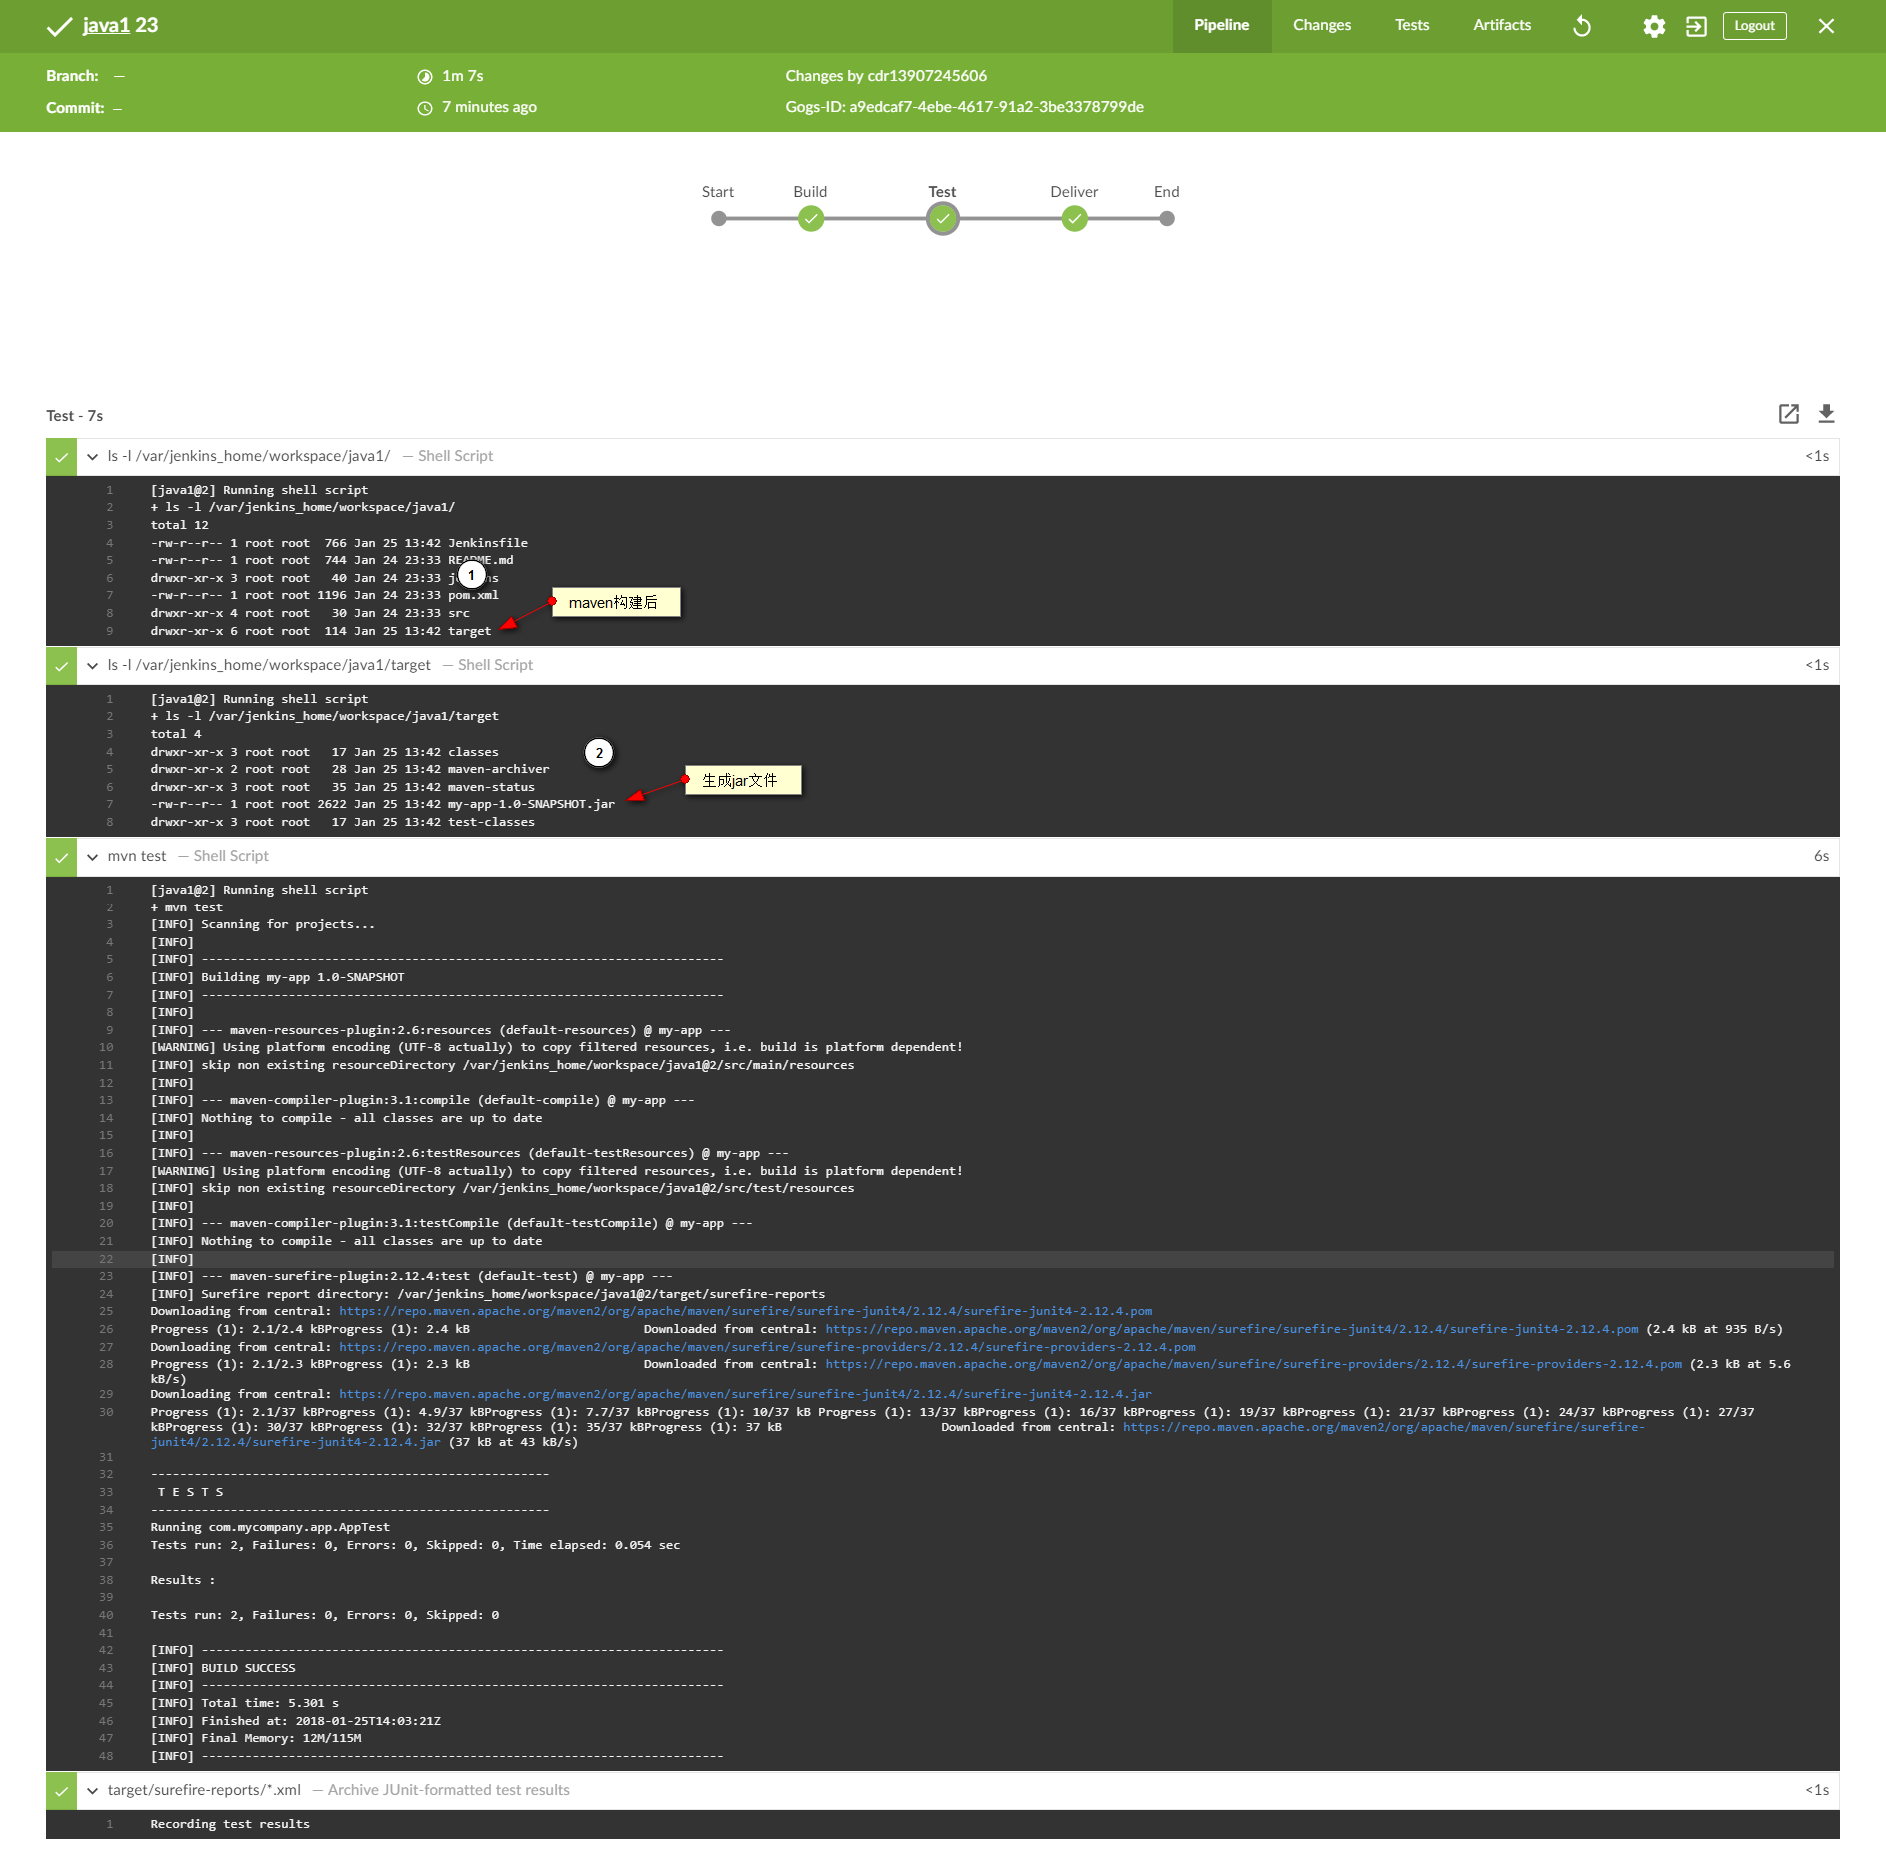
2.添加测试流程 类似,编辑pipeline,添加Test stage. 然后Shell Script 写 mvn test . 然后提交,会发现第二次运行pipeline的时间果然如上面预想,有缓存,基本很快就跑完了. 所以基于内网镜像仓库和git服务器速度还是可以的.
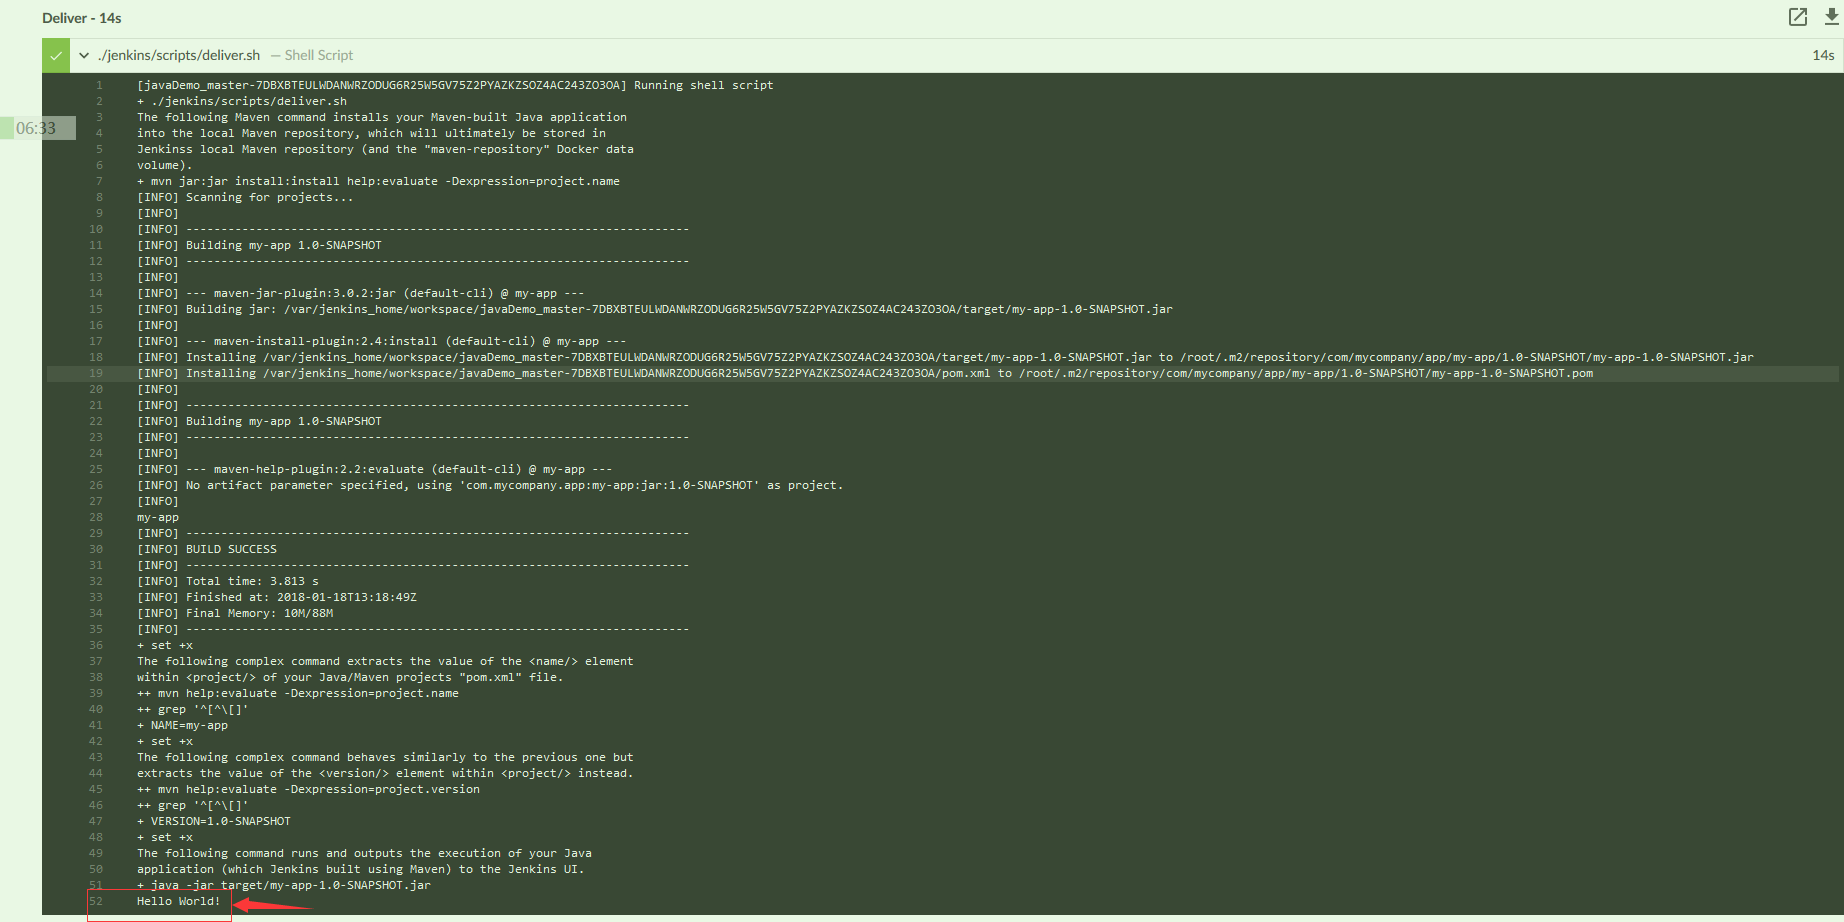
3.添加分发/部署流程 最后一步,我顺便把完整过程做了个动图展示一下.因为大小原因..在一直调整截屏位置.. 可以看到最后构建完分发出来有我们java app输出的 Hello world 输出. Success~ 总共耗时50s.
以下是完整的jenkinsfile内容.
1
2
3
4
5
6
7
8
9
10
11
12
13
14
15
16
17
18
19
20
21
22
23
24
25
26
27
28
29
30
pipeline { agent { docker { image '192.168.157.210/test/maven' args '-v /root/.m2:/root/.m2' } } stages { stage('Build' ) { steps { sh 'mvn -B -DskipTests clean package' } } stage('Test' ) { steps { sh 'mvn test' } post { always { junit 'target/surefire-reports/*.xml' } } } stage('Deliver' ) { steps { sh './jenkins/scripts/deliver.sh' } } } }
上面的运行完之后,可以很简单的参考之前gogs的文章添加一个webhook 来触发这个pipeline自动运行. 这就基本实现了普通的CI/CD了么? 先来测试看看吧. 修改App.java 中的hello world 为test webhook .然后保存,提交推送到gogs仓库. 发现pipeline在自动构建了. 经过数分钟等待. 我们惊奇的发现如下:
执行程序的结果居然没有改变. 那么思考一下整个过程,我们构建的时候几乎是很快跳过去的. 很自然去推jenkins重复利用了之前构建过的文件. 那么思路可以是构建前脚本删掉之前的文件 (注意不要随便使用 deleteDir()这个内置函数,会删掉环境workplace的东西,很容易把pipeline搞崩.详见我的排错文章(二) ),也可以是选择每次不使用缓存?(类似mvn clean )
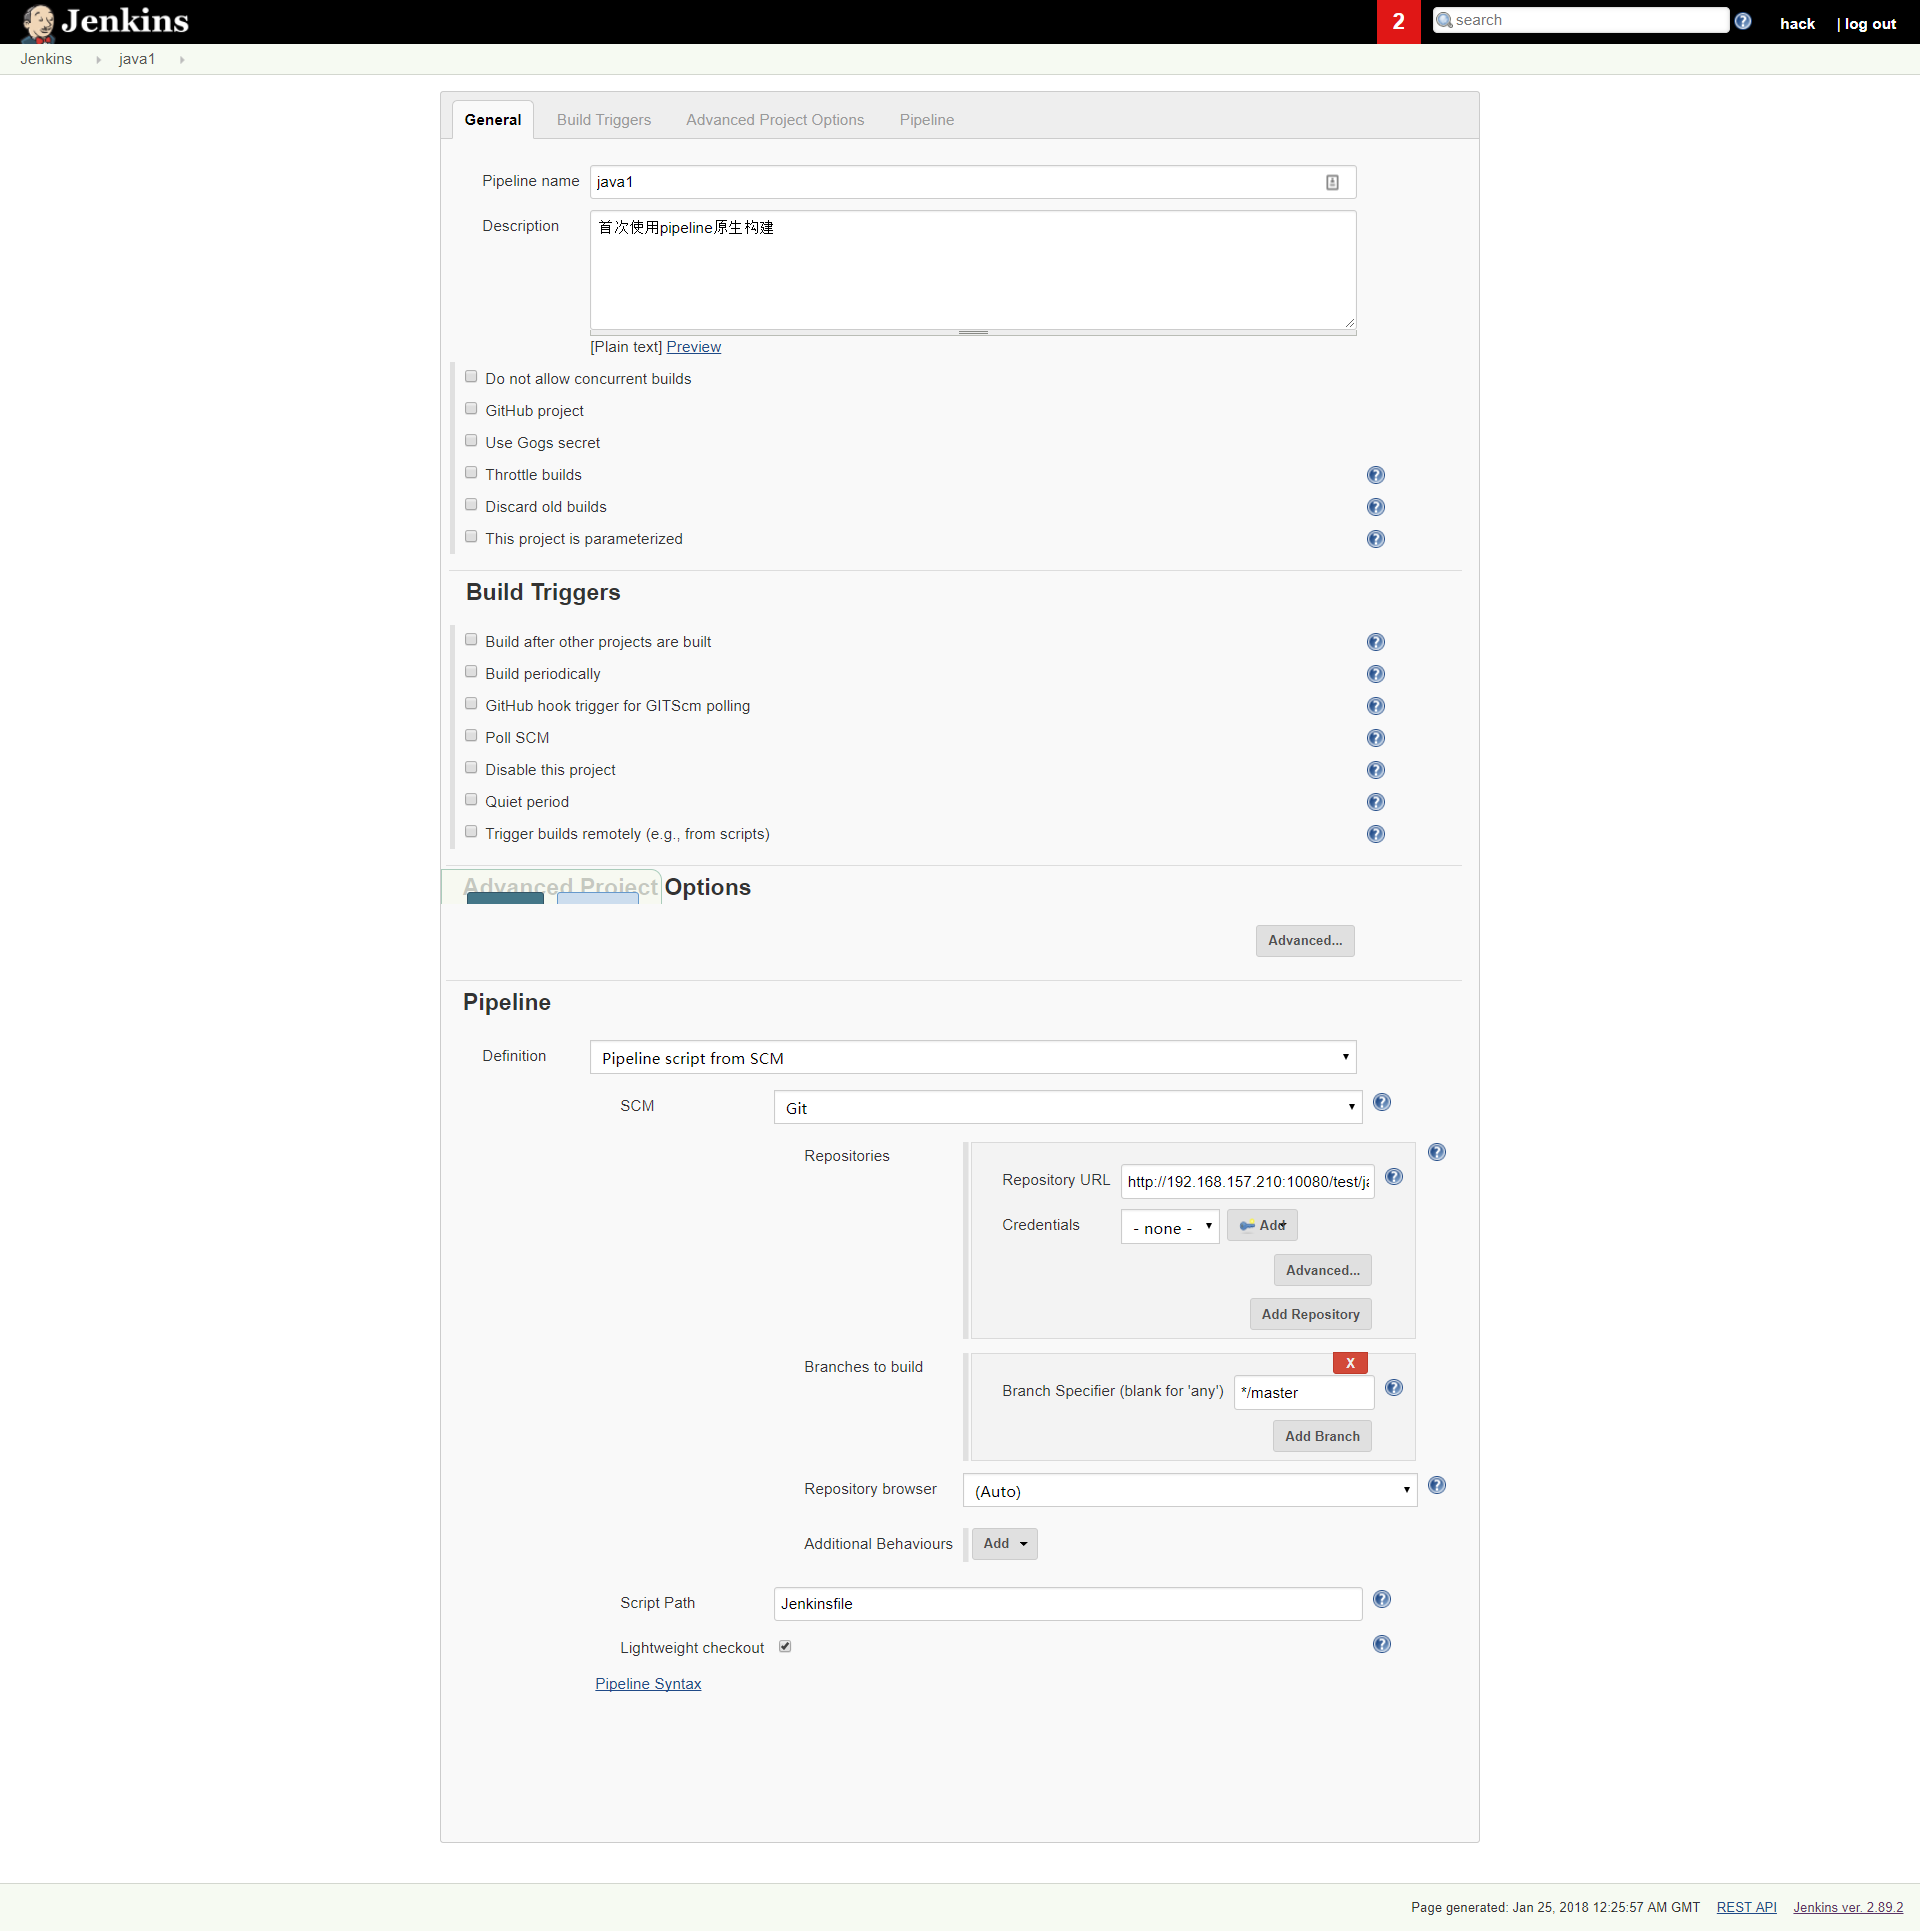
附: 下图是不使用blueocean时创建gogs+pipeline的完整配置,网上很多都是gitlab/github的.都不配套…
除了这个问题,还有个核心问题,我们上面只是应用了程序,还没有做分发. 分发就是要去自动的构建docker镜像,然后这样后续直接docker run 或者k8运行才能变成服务普通用户访问. 怎么构建呢?
最简单的思路就是pipeline里面依赖Dockerfile 去执行构建docker bulid xxx ,然后推送到Harbor镜像仓库.如图:
其中1&2&3的操作在之前已经完成. 所以我们关注剩下的④⑤⑥ . 因为我们上面的例子在第一步的时候已经创建了一个基于maven的一个docker容器. 所以这里我们需要审视一个问题 : 假设我们④和⑥步要做的代码如下
1
2
3
4
$ docker build -t java1:v0.1 ./ $ docker tag java1:v0.1 192.168.157.210/test/java1:v0.1 $ docker login 192.168.157.210 -u admin -p Harbor12345 $ docker push 192.168.157.210/test/java1:v0.1
根据这个流程. 那么采用tomcat的image进行构建. (一般推荐使用官方的tomcat:8.0-jre8 或者熟悉环境的tomcat:8.0-jre8-slim 前者500M+后者220M左右) 然后推送到本地harbor仓库. 因为这不是构建库,而是运行库理论上应该是采取最小镜像构建原则. (采用alpine版本+需要的东西,大概就几十M).
但是这里实践的时候遇到一个很棘手的问题,就是容器内部调用docker命令. 应该如何获取. 通过之前的经验,我先尝试在启动容器的时候加上-v /var/run/docker.sock:/var/run/docker.sock 试图共享. 但是失败了.查阅了很多资料. 最后详见这张图
然后后面折腾了很多,加改了一些新的东西. 新的pipeline版本如下: (最后一步仍然是不行的,因为在最外层声明了agent,里面再使用agent是内置容器而不是jenkins了.)
1
2
3
4
5
6
7
8
9
10
11
12
13
14
15
16
17
18
19
20
21
22
23
24
25
26
27
28
29
30
31
32
33
34
35
36
37
38
39
40
41
42
43
44
45
46
47
48
49
pipeline { agent { docker { image '59.xx.xx.37/test/maven' args '-v /root/.m2:/root/.m2' } } stages { stage('Build' ) { steps { sh 'mvn -B -DskipTests clean package' } post { success { archiveArtifacts 'target/*.jar,target/*.*pi' } } } stage('Test' ) { steps { sh 'mvn test' } post { always { junit 'target/surefire-reports/*.xml' } } } stage('Deliver' ) { steps { sh './jenkins/scripts/deliver.sh' } } stage('Docker Build & Push ' ) { agent { dockerfile { filename 'Dockerfile' additionalBuildArgs '--build-arg version=1.0' } } steps { sh 'echo testEnv = $testEnv' sh 'ls -al' sh 'ls -al ../' } } } }
最后参考了很多,还是决定转为使用脚本式pipeline. 也就是原生groovy语法.
1
2
3
4
5
6
7
8
9
10
11
12
13
14
15
16
17
18
19
20
21
22
23
24
25
26
27
28
29
30
31
32
33
34
35
node{ def app stage('Init Env' ){ checkout scm } stage('Maven Build' ){ sh 'mvn -B -DskipTests clean package' archiveArtifacts 'target/*.jar,target/*.*pi' } stage('Maven Test ' ){ try { mvn test } catch (error) { } finally { junit 'target/surefire-reports/*.xml' } } stage('Run App' ){ sh './jenkins/scripts/deliver.sh' } stage('Docker Build & Delivery' ){ app = docker.build("java1......" ) docker.withRegistry('https://59.xx.xx.37/test' , 'harbor-37' ) { app.push("${env.BUILD_NUMBER}" ) app.push("latest" ) } } }
最后祭出最终版本的声明式先: (折腾了一天的结果. 其中不少地方还待优化)
1
2
3
4
5
6
7
8
9
10
11
12
13
14
15
16
17
18
19
20
21
22
23
24
25
26
27
28
29
30
31
32
33
34
35
36
37
38
39
40
41
42
43
44
45
46
47
48
49
50
51
52
53
54
55
56
57
58
59
60
61
62
63
64
65
66
67
68
69
70
71
72
73
74
75
76
77
78
79
80
81
82
83
84
85
86
87
88
89
90
91
92
93
94
95
96
97
98
99
100
101
102
103
104
105
106
107
108
109
110
111
112
113
114
115
116
117
118
119
120
121
122
123
124
125
126
127
pipeline { agent any options {timestamps()} stages { stage("Init" ){ steps { echo 'Pipeline start~' sh 'ls -al' } } stage('Build' ) { agent { docker { reuseNode true image '59.xx.xx.37/test/maven' args '-v /root/.m2:/root/.m2' } } steps { withMaven(options: [findbugsPublisher(), junitPublisher(ignoreAttachments: false )]) { sh 'mvn -B -DskipTests clean package' } } post { success { archiveArtifacts(artifacts: '**/target/*.jar' , allowEmptyArchive: true ) } } } stage('Quality Analysis' ) { parallel { stage ('Maven Test' ) { agent { docker { reuseNode true image '59.xx.xx.37/test/maven' args '-v /root/.m2:/root/.m2' } } steps { echo 'Run integration tests here...' sh 'mvn test' } post { always { junit 'target/surefire-reports/*.xml' } } } stage('Sonar Scan' ) { steps { echo 'sonar scan here' } } } } stage("Run App" ) { agent { docker { reuseNode true image '59.xx.xx.37/test/maven' args '-v /root/.m2:/root/.m2' } } steps { sh './jenkins/scripts/deliver.sh' } } stage('Build and Publish Image' ) { environment { IMAGE = readMavenPom().getArtifactId() VERSION = readMavenPom().getVersion() ADDR = '59.xx.xx.37/test/' } when { branch 'master' } steps { sh """ docker build -t ${IMAGE} . docker tag ${IMAGE} ${ADDR}${IMAGE}:${env.BUILD_NUMBER} docker login -u admin 59.xx.xx.37 -p Harbor12345 docker push ${ADDR}${IMAGE}:${env.BUILD_NUMBER} docker run --rm -d ${ADDR}${IMAGE}:${env.BUILD_NUMBER} """ echo 'jenkins : $testEnv' } } } post { failure { mail to: 'tom@test.com' , subject: "工作流中有错误: ${currentBuild.fullDisplayName}" , body: "Something is wrong with ${env.BUILD_URL}" } } }
以及一个新的代码更新推送,镜像创建推送运行的整个流程的动图.


 maven
maven